+86 177 5193 6871
222, Block B, Diamond International, Guozhuang Road, Xuzhou, Jiangsu, China
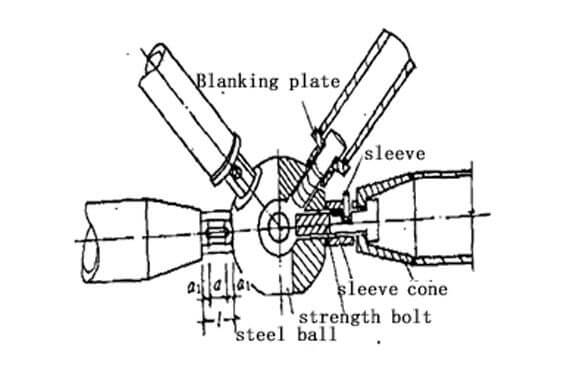
Bolt ball joints should comprise bolts, steel balls, pins (or screws), sleeves, cone heads or sealing plates (Figure 1), and are suitable for connecting steel pipe rods.

FIG. 1 Diagram of bolt ball joint
The steel pipe, sealing plate, cone head and sleeve of the bolt ball joint adopt the 16Mn steel stipulated in the national standard <Technical Conditions for Low Alloy Structural Steel> GB1591-88, and the steel ball adopts the national standard <High-quality carbon structural steel grade and general technical conditions 〉No. 45 steel stipulated in GB699-88, bolts, pins or screws adopt 40Cr steel stipulated in the national standard <Technical Conditions of Alloy Structural Steel> GB3077-88. The bolts of 8.8s use No. 45 steel. The product quality complies with the industry standard <Steel space frame Frame Bolt Ball Joints> JGJ75.1-91.
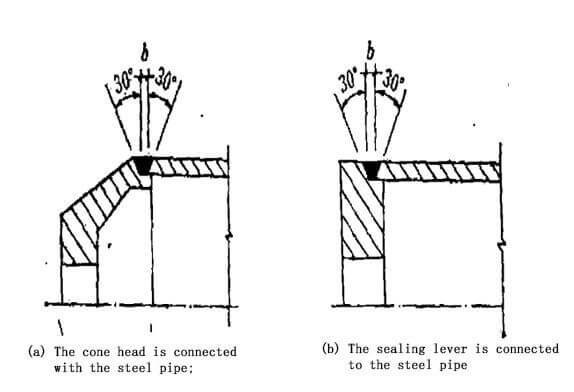
The pipes are connected by a conical head (Fig. 2-a) or sealing plate (Fig. 2-b). The connecting weld and any conical head section should be as strong as the connected steel pipe. The width b of the weld can be determined according to the wall thickness of the steel pipe. Take 2-5mm, and the thickness of the sealing plate should be calculated and determined according to the actual force. When the wall thickness of the steel pipe is less than 4mm, the thickness of the sealing plate should not be less than 1/5 of the outer diameter of the steel pipe.

FIG.2 Welding seam at the end of the pipe
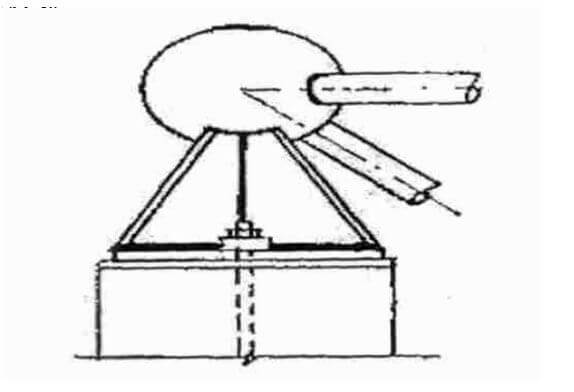
The support node (Fig. 3) adopts a structural form with reliable force transmission and simple connection.

FIG.3 Space frame Support node
2.1.1 The main materials of the bolted ball space frame include steel balls, cone heads, blanks for sealing plates, sleeves, welded pipes and seamless steel pipes, steel plates, high-strength bolts, etc. Among them, the steel pipe, sealing plate, cone head, and sleeve adopt the steel specified by the national standard.
2.1.2 Ball blanks, steel pipes, steel plates, and high-strength bolts for space frame frames are purchased from domestic professional manufacturers according to design drawings and standards. Incoming rough steel balls are inspected according to 5% of each specification, and no less than 5 pieces. 5% of each batch of high-strength bolts shall be spot-checked, and shall not be less than 5 pieces. The steel pipes are sampled according to the national standard “Steel chemical composition using experimental sampling method and chemical composition tolerance GB222-84” and “Steel mechanical and process performance sampling regulations GB2975-82” and the chemical composition analysis and mechanical performance test are carried out. Steel pipes of each specification shall be sampled and tested in each batch of no less than 3 pieces. The tensile test samples are 3 pieces per batch for each specification. Conehead, sleeve, sealing plate appearance, and allowable deviation are randomly inspected at 5% for each specification, and no less than 10 pieces.
Rough – car bottom surface – milling straight surface – milling inclined surface – drilling and tapping – derusting – labeling – general inspection – storage
(1) The appearance of used steel bolt ball blanks must have no cracks, burns or wrinkles. Ball diameter inspection D<120mm+2.0-1.0mm out-of-roundness tolerance 1.5mm D>120mm+3.0-1.0mm out-of-roundness tolerance 2.5mm.
(2) Datum drilling: face-to-center distance marked on the drawing, processing surface bottom: machine the bottom hole with a lathe, and chamfer the hole.
(3) Surface milling: The ball is positioned with the reference hole and reference surface, according to the face-to-center distance marked on the drawing, using a special fixture on the lathe, and milling out each spherical surface according to the spherical angle and center-to-center distance marked on the drawing. For the spherical surface processing of non-standard balls, X53K universal milling machine is used for processing, and the dividing head is used to take the bottom positioning hole as the reference and mill out the spherical surface according to the angle marked on the drawing.
(4) Drilling and tapping: According to the requirements of the drawing, align, drill, and tap on the spherical surface. The thread ≤ M39mm is processed directly on the radial drill; the screw hole with the thread > 39mm is processed on the C630 lathe.
(5) Derusting and painting: derusting and painting according to the drawings and process regulations.
(6) Ball number: After the datum plane is set, the ball should be numbered on the 1# surface; after all the ball processing is completed, and after the inspection is correct, mark the ball number with white paint according to the steel stamp number.
(7) Storage after confirmation by general inspection.
(1) Assembly: Assemble the qualified sealing plate or cone head, sleeve, high-strength bolts and set screws according to the requirements of the drawing.
(2) Picking materials: the straightness of the self-inspection pipe is not greater than L/1000, and ≤5mm. If it is out of tolerance, the pipe can be corrected on a straighter platform.
(3) Cutting: the steel pipe is cut according to the length of the drawing, and the pipe wall thickness ≤ 4mm is directly cut to the size L = ± 1; the pipe wall thickness > 4mm is cut to L + 3; the end face is guaranteed to be perpendicular to the axis, and no appearance appears Horseshoe-shaped cross-section; for pipes with a wall thickness > 4mm, grooves are processed at both ends of the pipe.
(4) Cutting equipment: G650 circular saw, band saw, pipe cutter.
(5) Assembly: Assemble the assembled cone head or sealing plate assembly with the steel pipe on the pre-welded mold. After checking that the length is correct, pre-weld 3-4 points in the circumferential direction of the sealing plate and the steel pipe.
(6) Surface cleaning: When welding, the work must be trusted, oil and water removed; when the workpiece is too damp, it needs to be dried by gas welding, and the surface oil should be cleaned and dried with a decontamination agent, and the surface can be cleaned with compressed air before application weld.
(7) Pre-welding: Install the pre-welded pipe on the mold, clamp the assembled cone head or sealing plate group at both ends, measure the length of the pipe, and pre-weld at three points on the welding joint.
(8) Full welding: the pre-welded pipe is fully welded. Use E43XX series electrodes (E50XX series) DC reverse connection method for welding. Before welding, the electrode must be baked in an oven at 350°C for more than 1 hour. And dry it as you use it. It is not allowed to reserve a large amount after baking; when welding, it is necessary to adjust the current on the arc strike plate and weld after adjustment. It is advisable to use narrow weld beads and short arc operation when welding. The technique should be stable, even and corrected to prevent arc deviation and false Solder and bite meat.
(9) Cleaning and rust removal: Clean up welding slag, and remove rust, oil stains, and other attachments on steel pipes.
(10) Inspection: inspect the weld bead quality and combination length, and the inspection amount is 100%.
(11) Painting: paint according to the drawings and process requirements, and mark the rod number on the left end of the pipe according to the requirements of the drawings.
(12) Storage after the general inspection
